

A client may ask for a cat eye, but her natural lashes, a hooded lid or the outer corner often call for a different solution. That is why “lash mapping steps” does not simply mean a sequence of lengths on the eye patch. A well-built lash map is a working plan that combines the anatomy of the eye, the condition of the natural lashes, the chosen effect and the load the hair can handle.
In eyelash extensions, a lash map saves corrections during the procedure, preserves symmetry and makes the result repeatable. This is especially valuable with regular clients who want the same look with every new set. Instead of making decisions section by section, you work from a clear scheme and keep control over length, curl and volume.
What lash mapping should solve
A lash map is not a universal template. The same sequence from 8 to 13 mm can open up one eye and weigh down another. Before you make the first mark, decide what visual result you are aiming for: an optically more open eye, an elongated silhouette, a soft natural effect or clearly defined volume.
Then assess the main limitations. What matters is how the natural lashes grow – up, straight forward or down, how dense they are and what their maximum stable length is. With weak, thin or damaged natural lashes, an ambitious map with a big jump in lengths is not a good commercial service, even if it looks impressive in a photo. Durability and the health of the natural hair are part of the final result.
The lash map should also take into account the shape of the eyelid. With a hooded lid, overly long lashes at the outer end can increase the feeling of heaviness. With close-set eyes, a stronger accent toward the outer third often balances the proportions. With wide-set eyes, a moderate focus around the center can give a more harmonious look.
Lash mapping: steps before application
1. Analyze the eyes in an upright position
Do not choose an effect only while the client is lying down. Ask her to look straight ahead and observe the lid line, the outer corner, the growth direction and the differences between the two eyes. Slight asymmetry is normal and the lash map can correct it, but do not try to achieve mathematical sameness at the expense of the natural shape.
Clarify expectations as well. Words like natural, foxy or voluminous are interpreted differently. Use professional examples to show the difference between squirrel, cat eye, doll eye and wet effect, then translate the client's wish into specific parameters. This reduces the risk of a mismatch between the requested and the achieved result.
2. Divide the eye into working zones
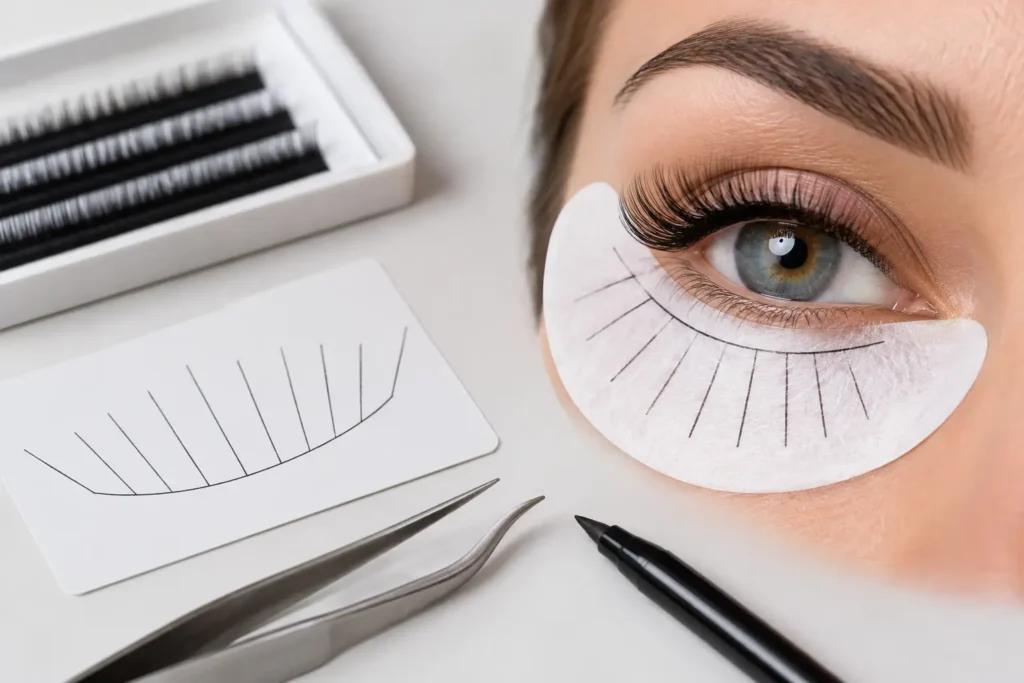
After placing the eye patches, mark the lower patch according to the visible line of the upper eyelid. The most practical approach is to divide the eye into six to eight sections. With fewer sections, transitions can become abrupt, and with too many, you lose time without real benefit, especially with classic eyelash extensions.
Work from the inner to the outer corner and mark each zone clearly. Do not use the map from one eye as an absolute measure for the other. If needed, adjust the boundaries according to growth and shape, but keep the logic of the effect.
3. Set the maximum length
The maximum length is not chosen at will but according to the natural base. As a professional guide, follow the safe load rule: the extension or fan should not exceed the strength of the natural lash or create tension at the root. With fine natural lashes, the difference between 11 and 13 mm can be decisive for retention.
Always plan shorter lengths in the inner corner. The natural lashes there are shorter, often grow in different directions and are not a good base for a strong accent. Do not automatically place the longest size at the outer end either – the last natural lashes are often fine and unstable.
How to build the length scheme
A natural effect usually follows a smooth line with a slight peak around the center or just after it. A sample map could be 7-8-9-10-11-10-9 mm. It suits a client who wants a neat look without a pronounced change in eye shape. However, the actual choice of curl and thickness can change the perception of length.
Doll eye puts the focus on the central zone. A scheme like 8-9-10-11-12-11-10 mm can visually open the eye, but it is not the best choice for very prominent eyes. With this effect, the transitions toward the outer part should stay soft so the silhouette does not look square.
The squirrel effect moves the peak before the outer corner. For example, 8-9-10-11-12-11-10-9 mm. This is often a safer alternative to the classic cat eye with a slightly hooded lid, because it lifts the look without visually pulling the corner down.
With a cat eye, lengths increase toward the outer third, but the final sections do not have to be the longest at any cost. A map like 7-8-9-10-11-12-11 mm often looks cleaner and more wearable than a scheme ending in 13 or 14 mm on weak outer lashes. The effect also depends on the curl: L or M can give a sharper line, while C and CC work more softly according to natural growth.
Choose thickness and volume according to the map
A length map has no value if it is combined with the wrong weight. In classic technique, the choice between 0.10, 0.12 and 0.15 mm depends on the diameter and strength of the natural lashes. A thicker single lash does not automatically make the work better – it simply increases visual density and load.
In volume techniques, balance comes from the number of fibers in the fan, the diameter and the length. For finer natural lashes, 0.05 or 0.07 mm allow controlled building of 2D to 5D volume depending on the specific base. Work with mega volume only when the natural lashes and your technique allow it. Overly large fans can worsen retention regardless of the quality of the adhesive.
For a wet effect, the lash map usually has more visible textured spikes. They should be planned in advance, not added on impulse. Use closed or semi-open fans with controlled width and leave soft enough transitions between the accents. This way the effect looks modern rather than scattered.
Control during the procedure
Once the map is drawn, follow it, but do not work mechanically. Check both eyes periodically, especially after building the middle and outer zones. Sometimes one eye has a shorter lid line or a different number of healthy natural lashes. In that case, a correction in one section is a professional decision, not a deviation from the plan.
Watch the placement direction. Even a perfect map with the right lengths loses its shape if the bases are not placed correctly or if the lashes cross. Isolation, a small and clean amount of adhesive and a stable base are directly linked to the design staying readable after weeks of wear.
Remember that the humidity and temperature in the room affect how the adhesive performs. If the adhesive sets too fast or too slow for your pace, the lash map will not make up for retention problems. Keep a consistent workflow with a suitable primer, cleansing supplies, fresh adhesive and precise tweezers.
Common lash mapping mistakes
The most common mistake is copying the same scheme for every client. The second is choosing lengths based on how they look on the tray rather than on the face. The third is a sharp jump of 2 mm between adjacent sections, which makes the design look unnatural. The fourth is placing the longest lashes on the weakest natural hairs in the outer corner.
An unsuitable curl also causes problems. With lashes that naturally grow downward, a C curl may not give the desired lift, while an overly strong D curl on very curly natural lashes can reduce the contact area. The choice depends on the base, not just the popular effect.
For organized work, prepare your tray in the order of the lash map, check the available sizes before the appointment and replace supplies in time. In the VM Beauty professional catalog, this means keeping a working stock of the main thicknesses, curls, adhesives and hygiene supplies instead of compromising the design because of a missing size.
The best lash map is the one the client wears comfortably, recognizes as her own and asks for again at the next fill. Record the lengths, curls, thicknesses and application specifics in the client file – this makes every next procedure faster, more precise and more profitable.